
Software for small motor
trader businesses.
Quick Start
Guide
Last updated :
19th April, 2012
CONTENTS
|
|
·
Vehicle stock records, including ex-stock records
·
The cash book (all transactions, including those not related to vehicle
sales).
The
best way to start using
Most windows that appear
when using the program have Status Bar tips to help and guide you as you work.
(Status bars are small strips across the bottom of windows that contain
information about the window.)
Don’t
worry if you make any mistakes when entering data as any entries made can be
easily undone, usually by highlighting the item, clicking on the right mouse
button and selecting ‘Delete...’ from the pop-up menu. Don’t be afraid to experiment!
Before
using
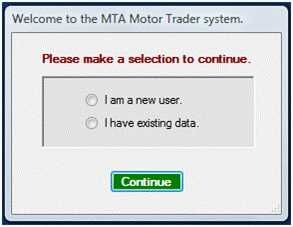
Select
‘I am a new user.’ and click on the [Continue] button.
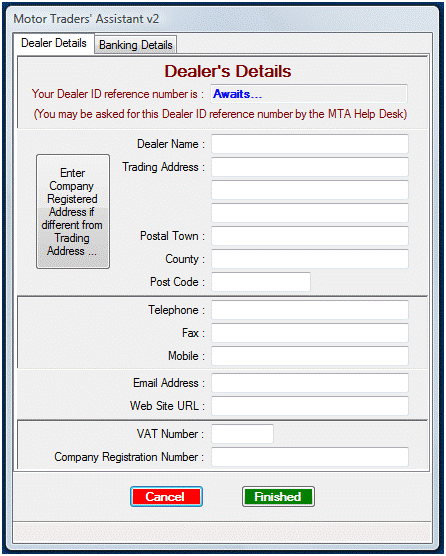
Simply
fill in the details, you can select each field by clicking on text boxes with
your mouse button or starting at the top, press the [TAB] button to move down
the fields as you type. The information
you enter is used on your invoices.
If
you want to include your banking details on your invoices click on the ‘Banking
Details’ tab and fill in your bank details and also whether or not you accept
credit/debit card payments.
There
is also a button to click on if your company’s registered address is different
from the one you trade from (for details on
your invoices).
After
the user details have been entered and the program opens for the first time,
you will see a screen like this:-

A
new row will appear in the list each time an entry is created for an in-stock
vehicle. To add an in-stock vehicle
record, you can either go to the ‘In Stock Vehicles’ menu and the top, then
select ‘Add a vehicle to stock...’ or place the mouse cursor anywhere over the
list and right click to select the same.
When
‘Add a vehicle to stock...’ is selected, a new window opens, ‘Purchase Invoice
Details.’ You will see that a stock number has been
allocated automatically (for the very first in-stock record, the number will be
1). Stock numbers cannot be allocated
by the user, they are only used to ensure that each stock number record is
unique and normally one is added to the last stock number used; so the next
stock number will be two. If a stock
record is later deleted, the missing stock number will be filled. Stock numbers do not affect your bookkeeping
records, they are only used internally by the system.
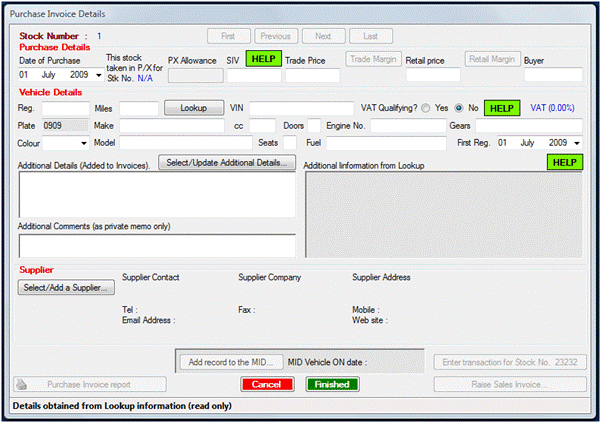
By
default the date of purchase and the date of first registration of the vehicle
is set to today’s date. After correcting
the date of purchase (if necessary), you can either select items with the mouse
or use the [TAB] key to navigate your way through the items in the Purchase
Invoice Details window.
The
SIV (Stand in Value) is usually the price that the user has paid for the
vehicle.
Click
here for an explanation of SIV. It is only necessary to enter a
Trade Price OR a Retail Price (both can be entered but at least one needs to
be). Don’t worry if you later sell the
vehicle for a different price; the values entered can be edited before a sales
invoice is created.
If
you need help in determining whether or not a vehicle is VAT qualifying or not,
click
here for more information about VAT qualifying vehicles. If you cannot find the information that you
are looking for from this source, you are welcome to contact
The
Buyer detail is optional. You may like
to know which of the staff purchased the vehicle, otherwise it may be left
blank.
After
entering the vehicles registration, you may click on the [Lookup] button to
obtain a plethora of detail about the vehicle.
Basically, you get all the information about the vehicle that is
available on most vehicle checks EXCEPT that the lookup does not provide
information about any outstanding finance, i.e., it does not replace an HPI or
similar finance check.
A
typical vehicle purchase invoice detail window will look like this:-
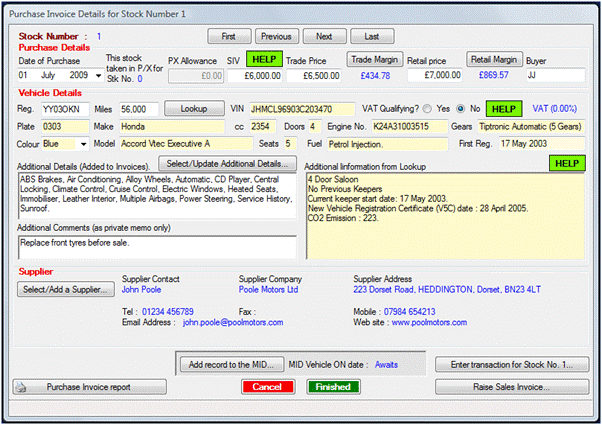
Entries
that have yellow backgrounds are fetched automatically after the [Lookup]
button is pressed. If the lookup does
not return any data or any particular field is edited, the background turns
back to white.
A
record of your look-ups is available to you by clicking on the ‘Lookup Log’
tool bar button or pressing F2 on your keyboard from the main screen.
When the details have all been entered and the green [Finished] button is clicked, the details of the invoice are automatically entered into the cash book for you. All you need do then is enter the details of the payment in the cash book.
SOR
stock is entered in a very similar way to In Stock items, just click on the SOR
Tool Bar button (or press F10 on your keyboard). For SOR stock, a [Raise Purchase Invoice]
button appears instead of a [Raise Sales Invoice] button.
Click
on the [Raise Purchase Invoice] button and the SOR stock is transferred to your
in stock list, whereupon a sales invoice can be raised.
The
text in the Additional Details box, (which is added to the printed Purchase Invoice)
is easily entered because you only need to tick boxes. You can, if you wish add, edit or delete any
of the options boxes as well as type in whatever you like into the Additional
Details box. To complete the Additional
Details box, click on the [Select/Update Additional Details...] button. A window will appear:-
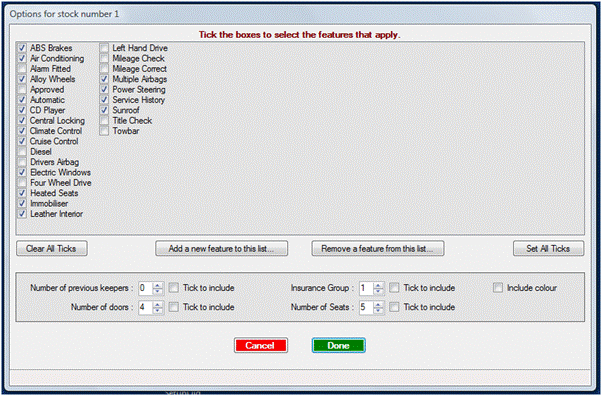
In
the upper section, you can tick boxes as appropriate and if you want to add a
new feature or remove an existing feature, this can easily be done by clicking
on the appropriate buttons at the bottom of the list and following the prompts.
In
the lower section, the number of previous keepers, doors, seats, etc., will be
set where this information is available from the returned vehicle lookup
information. If you click on the ‘Tick
to include’ boxes, then this information will also be included in the
Additional Details text box. These are
global settings and will remain for each following new in-stock vehicle
record.
The
boxes can be undeleted as well as editing whatever information is put
automatically into the Additional Details box.
A
contact record is created for each person or company that you have invoice
transactions with (incoming and outgoing invoices).
For
existing Vehicle Purchase Invoices, when you click on the [Select / Add a
Supplier...] button (click here to view the window), a Contacts Search window appears
with the displayed contact already selected as displayed below:-
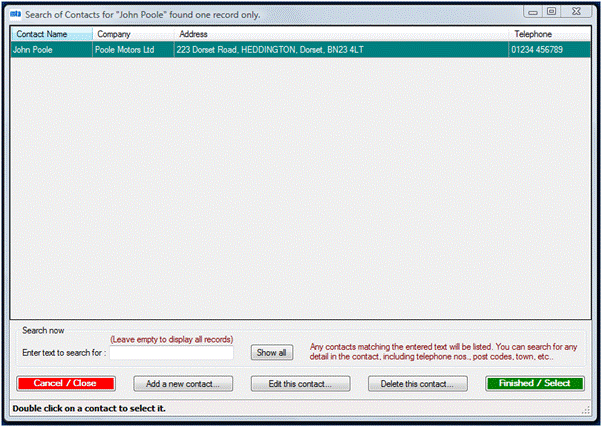
If
another existing contact is required to be selected, entering the details into
the search box will quickly bring up the required contact (as each character is
entered into the box, the list of contacts that matches the entered text
refreshes).
Clicking
on the [Show all] button will display all existing contact records.
New
contacts can be added while entering new vehicle records, just click on the
[Add a new contact...] button. Existing
contacts can also be edited :-
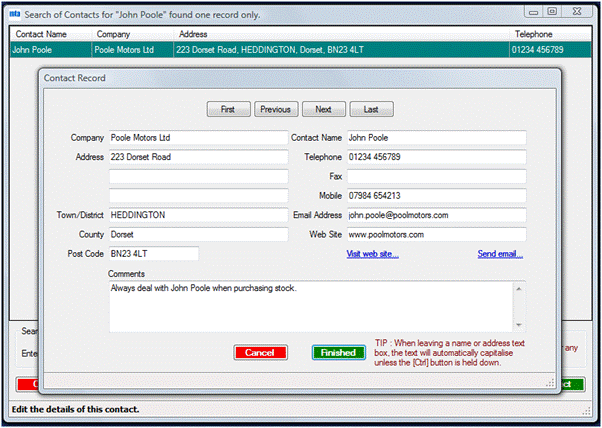
Once
a contact record has been added, the links (in blue) to any web site and/or
email address become active.
It
is possible to cycle through the contacts list using the navigation buttons at
the top of each contact record.
Entries,
where appropriate are automatically capitalised but this function can be
overridden by holding down the [Control] key on your keyboard when leaving the
box concerned.
From the
start up screen, you can open the cash book by either
clicking on the Cash Book tool bar button or by pressing F5 on your
keyboard. A window will open showing
cash book data.
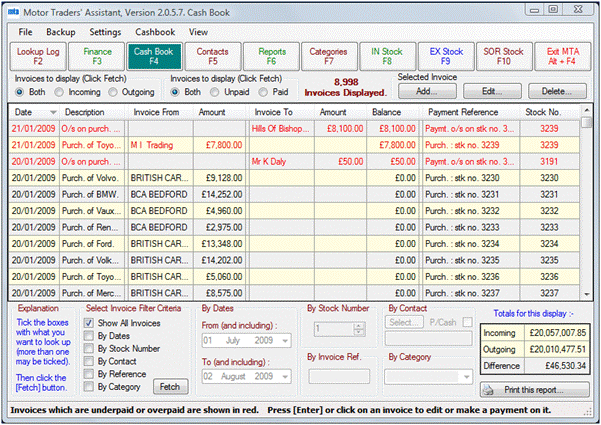
The data
that is displayed depends upon which filter boxes have been ticked. In the picture above, ‘Show All Invoices’
filter box is ticked. In addition to the
filter boxes, there are options above the table to select which invoices to
display, i.e., incoming or outgoing or both and also either paid or unpaid or
both. By the use of the selection boxes
just about any view of your data may be displayed and the resulting view can
also be printed by clicking on the ‘Print this report’ button on the bottom
left corner of the screen.
For
example, if you want to view what had been spent on computer software in the
last 3 months, you would select the ‘By Category’ box and as soon as the tick
appeared, the By Category combo box would be enabled so that you could select
from the categories list, ‘Computer Software.’
Then select the By Dates selection box and enter the dates that you are
interested in. Once you have set up your
criteria, click on the [Fetch] button and the data will be displayed.
By use of
these selection boxes, you can, for example, search for a particular customer’s
data (select ‘By Contact’), or for invoice references, stock numbers, etc..
Items that
have a zero balance (i.e., paid), will be displayed in black. If the balance on an invoice is non-zero
(either unpaid or overpaid), the line for that invoice will be displayed in
red.
Some Cash
Book invoices are made automatically for you:-
·
Purchases and sales of vehicles
·
Road tax sales and purchases
·
Warranty sales and purchases
·
Deposits of vehicle sales
·
Part exchanges
The
automatic invoices are posted against the stock numbers to which they
refer. Non-automatic cash book items
should always be referenced to their associated stock numbers (the program will
prompt you do to this at the time of entering new invoices). By associating cash book invoices with stock
numbers you enable the program to produce accurate sales analysis of each stock
item.
An example
of a non-automatic cash book entry could be the cost of a valet before the
vehicle is put up for sale; the cash book item could be put into the category
of vehicle preparation and the program will prompt you to enter the stock
number so that the cost of the vehicle preparation is accounted for in the
sales analysis for that particular vehicle.
When
switching from an in stock or ex stock list to the cash book, whichever stock
item is highlighted in the list, the associated cash book invoices will be
displayed in the cash book for ease of use.
All
invoices will initially be listed in red because they have no payment on them. Once a payment is entered, the listing will
go black if the balance outstanding is zero. Click on [Enter a new payment]
button to enter a payment.
Adding/Editing/Deleting Cash Book Invoices
You may
manually enter a new cash book invoice by right clicking anywhere over the list
in the Cash Book view and selecting ‘Add a new invoice record...’ or by
clicking on the button [Add...] on the right under the tool bar. This window will appear:-
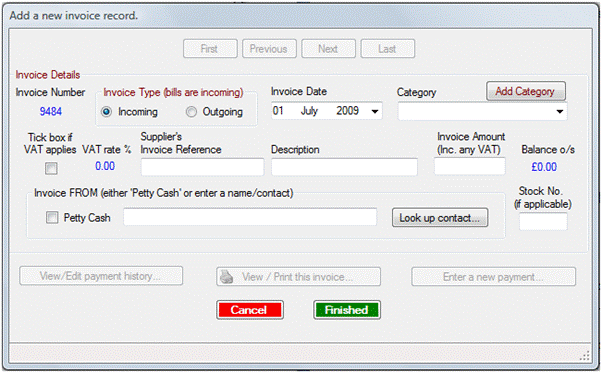
The invoice
number is automatically generated for you and has no meaning other than being a
unique reference to this invoice. You
can [TAB] your way through the window or click with your mouse on each section
that needs to be completed. The invoice
date is set automatically to today’s date; click on the down arrow to change it
if you need to.
If the
category selected is subject to VAT, the appropriate rate (as set in the
categories table when set up in your Settings/Preferences menu) appears in the
VAT rate in blue type. If VAT does not
apply to this particular invoice (e.g., if the supplier is not VAT registered),
then un-tick the VAT applies check box.
When you
have entered the required information, click on the green [Finished] button and
if the Stock Number box remains empty, you will be prompted to enter a stock
number if this item relates to a particular stock number. If it doesn’t, just cancel the prompt. It’s important to enter a related stock
number if you want to rely upon the sales analysis reports for individual stock
items.
Existing
cash book invoices can be edited at any time (click on the [Edit...] button in
the Cash Book view) although automatically generated items have certain
restrictions on what may be edited to help you to avoid making mistakes.
Any invoice
may be deleted by either selecting it and right clicking on the mouse button
and then selecting ‘Delete highlighted invoice....’ from the pop-up menu. Alternatively, select the invoice to be
deleted and press the [Delete...] button in the Cash Book view.
Payments on
an invoice can be deleted (without deleting the invoice). Click on the [View/Edit payment history...]
button, select the payment to delete, right click the mouse and select ‘Delete
cash book payment...’ from the pop-up menu.

You will be
asked to confirm the deletion before it takes place, as you will elsewhere in
the program whenever deleting items.
From the start up screen, you can view most reports by
either clicking on the Reports tool bar button or by pressing F6 on your
keyboard. A window will open showing the
reports available.

Depending
upon which report is selected, a box may appear after selecting a report,
asking you to enter either a period of time (e.g., start and end dates for a
VAT return) or a range of numbers (e.g., for which stock numbers you want the
report to cover).
The best
way to learn about the reports is to use them and they are quite self-evident
in their use. Reports are a powerful
tool in managing your business, they can display your profit and loss for any
period you specify, assist you in bank reconciliations (by displaying your
business cheque book numbers, credit card transactions, direct debits,
etc.). Your debtors and creditors lists
are a single mouse click away. The stock
book report contains all relevant information about each stock number that has
ever been entered onto the system.
There are a
number of options for reports and these can be found by clicking on the menu on
the opening screen and selecting the ‘Printed invoices options’ tab (Click
to view Set Preferences window)
It is important to realise that unlike most accounting systems,
Because of
the way the data is compressed and stored, it will always backup and restore
quickly. Some of our users are dealers
with large turnovers and have been using our software for ten years and their
data still loads quickly; there is no reason to archive data and to make it
difficult to retrieve. There is no
reason, therefore, to had a month-end, quarter-end or year-end procedure. Simply select the period that you would like
a report or view to cover.
You can back up your data either locally or remotely (i.e., on the computer you
are using at the time or to another computer on a network or the Internet).
We recommend that you use BOTH methods and
that you back up your data every day.
We
recommend that you back up online to the
To make a
backup online, you can do this manually or automatically (every time the
program closes). To back up manually, go
to the menu on the opening page and select Backup/Backup current data to
To make an
online backup to the
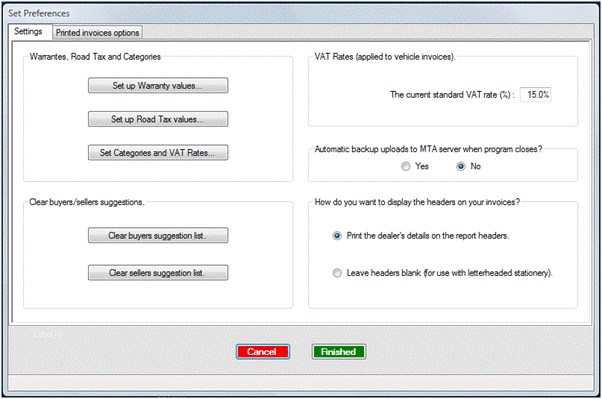
On the
right hand side, about half way down, there is an option “Automatic backup
uploads to
Please note
that for security reasons, data can only be restored from the computer that
uploaded it. If you want to open your
data on another computer on which
You
have an option to set a password so that only persons who know the password can
open
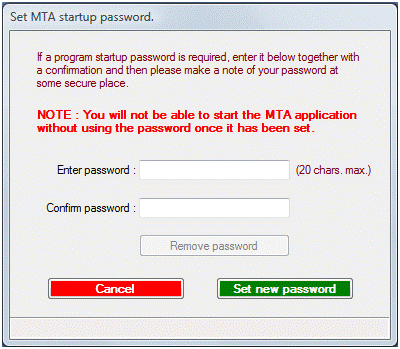
Once
the password has been set, it will be needed in order to open
It is also possible to password protect the cash book, so
that for example, sales staff may enter details of vehicles purchased or sold
but are prevented from viewing potentially sensitive data held in the cash book,
e.g., wages, overheads.
If
the password is lost or forgotten, contact
Free
trial users as well as registered users are entitled to free upgrades.
©